grub rescue on Ubuntu 14.04 and Windows 7 Dual boot

ကွန်ပျူတာမှာ Ubuntu သုံးချင်တာနဲ့ Windows 7 မှာ Dual Boot တင်ဖို့အတွက် ကြိုးစားနေတာ ၃ ရက်လောက်ရှိပြီ။ ခုတော့ အဆင်ပြေသွားပါဘီ။ ခုကွန်ပျူတာမှာ OS ၂ ခု တင်ထားတယ်။ တစ်ခုက windows 7 နောက်တစ်ခုက Ubuntu 14.04 ။ ဒေတာ အတွက် partition တစ်ခု။ မနေ့ညက Windows 7 မှာ Windows Update တွေ အင်စတောလုပ်ပြီး restart  လုပ်လိုက်တာ ပြန်ပြီးတက်လာတော့ အောက်ကပုံအတိုင်း မြင်ရပါလေရော…


တော်တော်လေးကို စိတ်ညစ်သွားတယ်။ ဘာလို့လဲဆိုတော့ ဒါကို သုံးဖို့အတွက် အင်စတောလုပ်နေတာ ၃ ရက်လောက်ရှိဘီ။ အဲဒါနဲ့ အင်တာနက်မှာ လိုက်ရှာရင်း သူတို့ပြောထားတဲ့အတိုင်း လုပ်ကြည့်ရတာပေါ့။ နောက်ဆုံးအောက်ကနည်းလမ်းလေးနဲ့ အဆင်ပြေသွားတယ်။
ပထမဆုံး grub > မှာ ls လို့ရိုက်ပြီး enter နှိပ်လိုက်ပါ။
ကျွန်တ​ော့်ဆီမှာတော့ အောက်ကအတိုင်း မြင်ရပါတယ်။
(hd0)(hd0,msdos5)(hd0,msdos4)(hd0,msdos2)(hd0,msdos1)
ကျွန်တော်ဆီမှာ Windows 7, Ubuntu, Data ပြီးတော့ windows 7 အတွက် System Partition တစ်ခုရှိတယ်။ အဲဒီတော့ ဘယ် Partition က Ubuntu တင်ထားမှန်းမသိရဘူး။
သိရအောင် အောက်ကကွန်မန်းကို တစ်ခုပြီး တစ်ခုရိုက်ကြည့်ပါ။

ls (hd0,msdos5)/
ls (hd0,msods4)/
ls (hd0,msdos2)/
ls (hd0,msdos1)/

Ubuntu တင်ထားတဲ့အပိုင်းမှာ Linux Directory တွေ တွေ့ရပါမယ်။
တစ်ခြား Partition တွေအတွက်ဆိုရင်တော့ “error: unknown filesystem.” ဆိုပြီးပြပါလိမ့်မယ်။
ကျွန်တော့်အတွက်ကတော့ (hd0,msdos4) က Ubuntu တင်ထားတဲ့ အပိုင်းပါ။
အောက်ကကွန်မန်းတွေကို ဆက်ရိုက်ပါမယ်။
set root=(hd0,4)
set prefix=(hd0,4)/boot/grub
insmod normal
normal

အဲဒါတွေရိုက်ပြီးတာနဲ့ OS ၂ ခု ရွေးတဲ့နေရာကို ပြန်ရောက်သွားပြီး အဆင်ပြေသွားပါတယ်။
ကျွန်တော်လိုမျိုး ပြသနာတက်ခဲ့ရင် အဆင်ပြေအောင် မှတ်တမ်းတင်ထားလိုက်ပါတယ်။

How to Enable/Disable CD Burning?

If you choose to use a different CD burning program than the one supplied with Windows XP this edit will disable the default burner.

[Start] [Run] [Regedit]
Registry Key: HKEY_CURRENT_USER\Software\Microsoft\Windows\CurrentVersion\Policies\Explorer
Modify/Create the Value Name [NoCDBurning] according to the Value Data listed below.
Data Type: REG_DWORD [Dword Value] // Value Name: NoCDBurning
Value Data: [0 – Enable Burning / 1 – Disable Burning]
Exit Registry and Reboot

Enable/Disable CD Burning for the Local Machine

[Start] [Run] [Regedit]
Registry Key: HKEY_LOCAL_MACHINE\SOFTWARE\Microsoft\Windows\CurrentVersion\policies\Explorer
Modify/Create the Value Name [NoCDBurning] according to the Value Data listed below.
Data Type: REG_DWORD [Dword Value] // Value Name: NoCDBurning
Value Data: [0 – Enable Burning / 1 – Disable Burning]
Exit Registry and Reboot

Software install လုပ်နေစဉ် ရှောင်ကျဉ်သင့်သည့်အချက်

အခုပြောပြမယ့် အကြောင်းကတော့ ဆော့ဝဲတွေ အင်စတောလုပ်နေစဉ်မှာ ရှောင်သင့်တာလေးကို ပြောပြချင်လို့ပါ။
ဆော့ဝဲတွေကို ဒေါင်းလုပ်လုပ်တဲ့အခါမှာ ကိုယ်ပိုင် website ကနေ ဒေါင်းလုပ်လုပ်ရတာမဟုတ်ဘဲ CNET, Brothersoft.com, softnic.com  တို့ကနေ ဒေါင်းရပြီဆိုရင် သတိထားဖို့လိုပါမယ်။
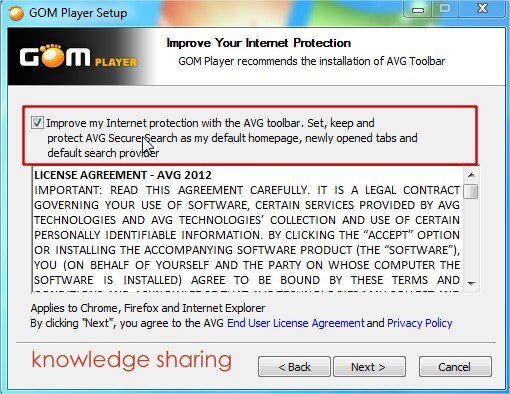
ဒီနေ့ GOM Player ကို CNET ကနေ ဒေါင်းလိုက်ပါတယ်။ ပြီးတော့ အင်စတောလုပ်တဲ့အခါမှာ သတိထားမိတဲ့အချက်လေးကို အောက်ကပုံလေးမှာ ကြည့်ရင် သိနိုင်ပါတယ်။

soft_installation

အနီရောင်နဲ့ဝိုင်းပြထားတဲ့ AVG Secure Search ဆိုတာကို Check လုပ်လိုက်ရင် သင့်ကွန်ပျူတာမှာ ရှိတဲ့ Browser မှာ AVG Secure Search ဆိုတာကို အင်စတောလုပ်သွားပါမယ်။

အဲဒီလိုဆော့ဝဲတွေ အင်စတောလုပ်တာများသွားရင် သင့် Browser မှာ မလိုတာတွေများပြီး တဖြည်းဖြည်းနဲ့ လေးသွားပါလိမ့်မယ်။
အဲဒီတော့ ဆော့ဝဲတွေကို မူရင်း website ကနေမဟုတ်ဘဲ တခြားလင့်တွေကနေ ဒေါင်းရတဲ့ ဆော့ဝဲတွေကို အင်စတောလုပ်တဲ့အခါမှာ သတိထားနိုင်အောင်ဒီပို့လေးကို ရေးလိုက်တာပါ။
အားလုံးကိုကျေးဇူးတင်ပါတယ်။

USB stick ကနေ windows 7 ကို ဘယ်လိုတင်မလဲ

တစ်နေ့က အခွင့်အရေးရတာနဲ့ USB Stick ကနေ Windows 7 ကို ဘယ်လိုတင်သလဲဆိုတာကို လိုက်ရှာပြီးစမ်းဖြစ်တယ်။ အားလုံးအဆင်ပြေပြေနဲ့ အောင်မြင်ခဲ့တယ်။
အခု ဘယ်လိုလုပ်ရသလဲဆိုတဲ့ အဆင့်တွေကို ပြန်ရှယ်လိုက်ပါတယ်။
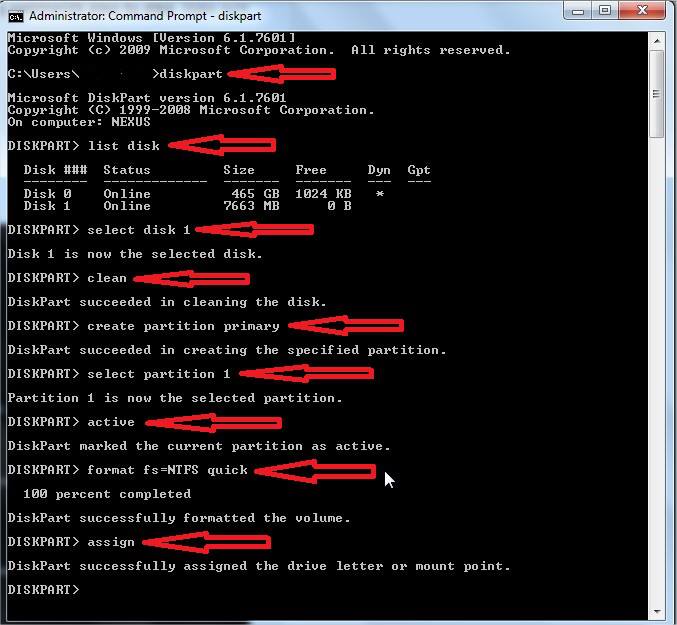
ပထမဆုံးအနည်းဆုံး 4GB ရှိတဲ့ Memory Stick တစ်ခုလိုမယ်။ ဒေတာတွေရှိရင် Backup လုပ်ပြီး format လုပ်လိုက်ပါတယ်။ ပြီးရင် command prompt ကို Right Click လုပ်ပြီး Run As Administrator ကို ကလစ်ပါမယ်။ ပြီးရင် အောက်ကပုံအတိုင်း Command တွေကို တစ်ခုချင်းရိုက်ပါမယ်။

usb1

Command တစ်ခုချင်းဆီကိုလဲ ဒီမှာ ပြန်ရေးပြလိုက်ပါတယ်။

diskpart
list disk (ဒီနေရာမှာ Disk နှစ်ခုတွေ့ရပါမယ်။ တစ်ခုက HDD တစ်ခုက USB Stick(7663MB)ပါ)
select disk 1
clean
create partition primary
select partition 1
active
format fs=NTFS quick
assign

ပြီးရင် Windows 7 DVD ကို DVD Drive မှာ ထည့်လိုက်ပါ။
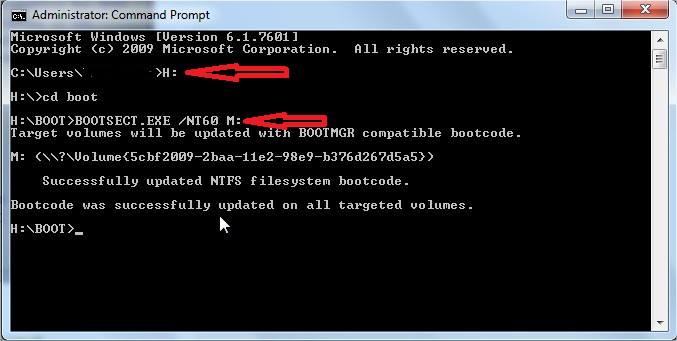
ပြီးရင် အောက်ကပုံအတိုင်း ကွန်မန်းထပ်ရိုက်ပါ။

usb2

ဒီပုံမှာဆိုရင် H: က CD Drive ပါ။

M: ကတော့ Memory Stick ရဲ့ drive letter ပါ။
ရိုက်ရမယ့် ကွန်မန်းတွေကတော့

H:
cd boot
BOOTSECT.EXE /NT60 M:

ပြီးရင် DVD Drive ထဲက ဖိုင်တွေအားလုံးကို copy လုပ်ပြီး memory stick ထဲကို ကူးလိုက်ပါ။
ဒီအဆင့်တေါပြီးရင်တော့ ဝင်းဒိုးတင်မယ့်စက်မှာ memory stick ကို တပ်လိုက်ပြီး restart လုပ်ပါ။
ပြီးရင် BIOS ထဲဝင်ပြီး First Boot ကို removable USB ကို ပြောင်းလိုက်ပါ။
ပြီးရင် Save and Exit လုပ်ပါ။
စက်ပြန်တက်လာရင် USB ကနေ Boot လုပ်ပြီး Windows Installation Process စတင်လုပ်ပါလိမ့်မယ်။
ကျန်တာတွေကိုတော့ Windows Install လုပ်တဲ့အဆင့်အတိုင်းဆက်ပြီးလုပ်ပါ။
အားလုံးကို ကျေးဇူးတင်ပါတယ်။